Friday, December 16, 2011

Crafty Christmas Tree Challenge Roundup


Thanks to everyone who participated in the challenge!

There were so many fun ornaments and great trees. Here are a few things from everyone who participated.

Karah from The Space Between made so many cute things, I was constantly delighted by her creativity. She started by building her own tree from driftwood. Umm hello... I knew she was serious after I read that! Then combed the beach of her little island paradise for almost all of her materials.

I was totally hooked by this story. And- Wow the finished tree is so unique!


This adorable snowman is made from some of the shells she collected on that trip. Isn't it AMAZING.


Karah had so many great ornament ideas- I think I flipped over everyone of her posts!


Pam from Gingerbread Snowflakes loves the holiday season (hence her great blog name)! So this challenge was perfect for her! Although I really don't know how she made time for it because she's been super busy posting great projects, different holiday customs from around the world, and hosting a cookie recipe swap. But I'm SO glad she did because she's wonderfully creative.

Here's her brilliant woven gingerbread man ornament (Pam has been by weaving guru by the way).

P1130044

And these fabulous sparklykanzashi/yo yo garlands. Oh and you have to check out her coffee filter versions from the same post too. They are such a great idea!

P1120983


Then there was Kristy from Shadowfell Designs. I loved that she wanted to make ornaments for her crafty tree that would be engaging and safe for her young son.


She wound up with a colorful and cute tree that had an ABC/Animals theme.


The foundation for all the decorations was this colorful chain made from a material more durable than paper but still very affordable. It was a great idea I hope you check out her post!


Lisa from Lisa's Craft blog has been going strong with all sorts of holiday tutorials almost everyday as part of her Christmas Crafting Marathon.

I LOVED her puzzle piece snowflakes (she made trees with the same technique too).


What a great idea for all those puzzles with missing pieces, right! I bet you could get some old puzzles at tag sales or thrift stores and go nuts making all sorts of ornaments with this idea.

And aren't these glass balls colored with ink gorgeous! She's got a great tutorial for making them- here.


Anne from Lady Anne did a coastal themed tree. And although she went a little over the $20 budget the tree looks a lot more expensive than it really was.
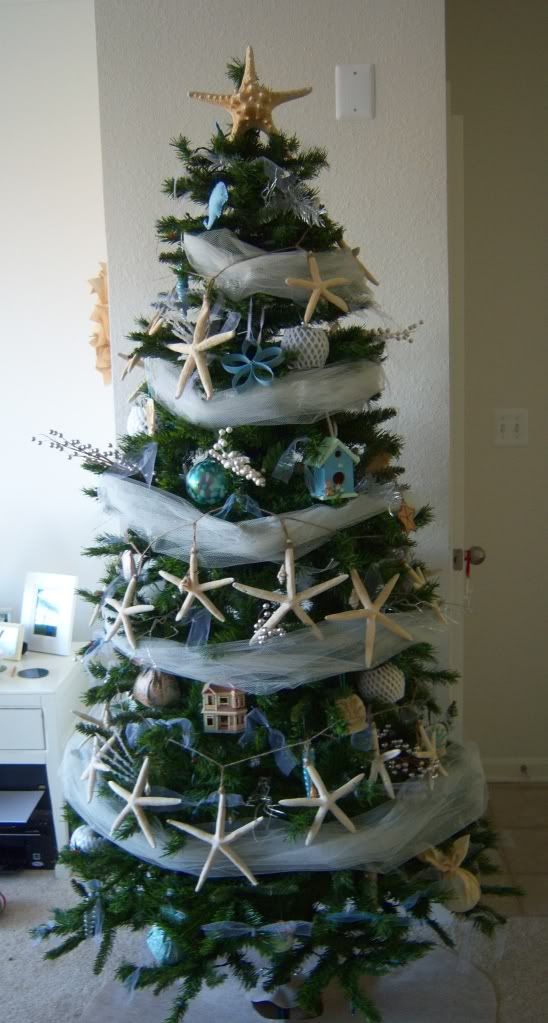

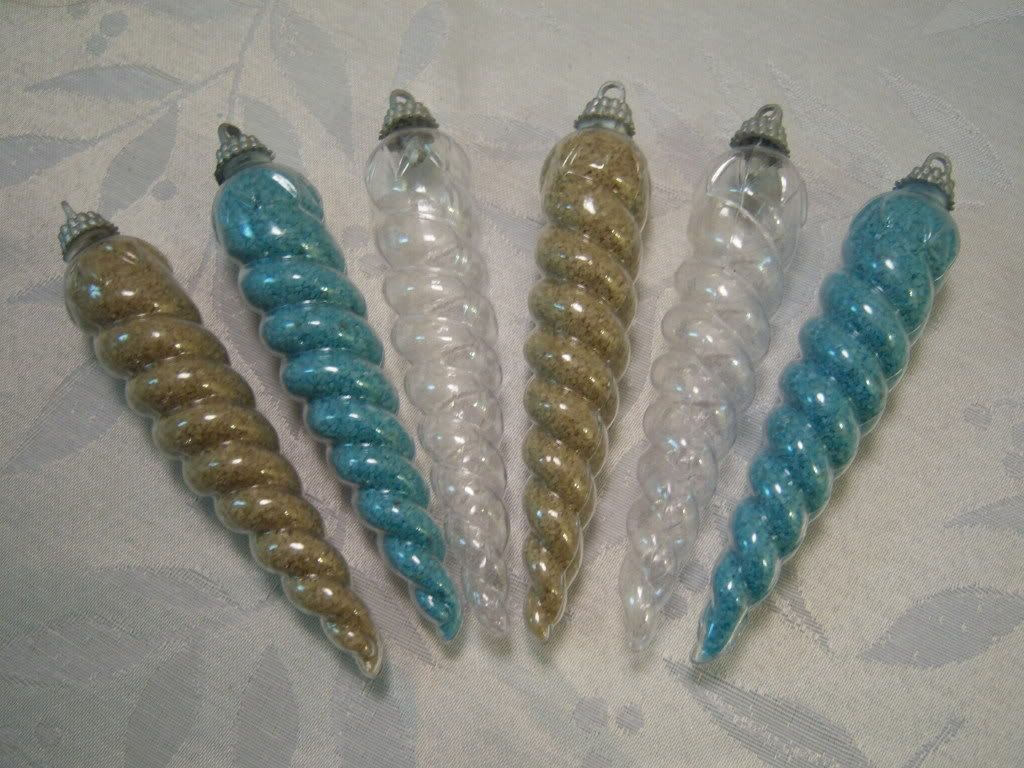
She made a bunch of great ornaments. One of my favorites were these plastic icicles filled with sand. They look like spiral shells.

She made an adorable felted blue whale ornament and a lots of decorations for her entire house too!

There were two different ladies from Gals & Wine working on trees.


Sara made these inventive ornaments. Mostly from tin foil, and hot glue if you can believe it! She has a tutorial on making them here.

She also made these neat spiral wire ornaments.


And Kayla made this beautiful tree topper for only a dollar!


All the participants worked so hard to hand make their trees, during what is already a busy time of year. I think they all turned out wonderfully. Please give them some link love and leave a comment or two letting them know what a great job they did!

Thursday, December 15, 2011

Crafty Christmas Tree Reveal!


Who knew that I'd run out of time before I ran out of money!


There were at least two ornaments I wanted to get on the tree (Ice Skates and Snowmen) but today's the deadline I gave myself to finish and I just didn't get them up there.

However I'm extremely happy with how the challenge turned out... and here's the finished tree!

The theme is "Baby it's cold outside" (named for one of my favorite holiday tunes). So most of my ornaments had to do with snow, and a cozy warm things.


For all my "budget blues" I ended up having money leftover! The grand total came to $14.97 leaving me with $5.03 left from my $20.00 budget.


You might notice a few ornaments (quilled hearts, honeycomb coffee filter balls), and the tree topper that I haven't done tutorials for yet. Those will be coming soon!


For today I'm just going to relax and maybe wrap a few gifts for under the tree.


Thank you SO much to everyone who played along with the challenge, followed along with the posts, and left encouraging comments along the way! I appreciate it so much.

I'll be doing a roundup of ornaments and finished tree's from all the participants this week and next week! I hope you'll visit everyone who's participated because there were some really amazing ornaments and finished trees!

And in case you missed any of these you can look back through all my posts on the Crafty Christmas Tree Challenge.

Turn PT Tubes into Hot Chocolate Ornaments


If you been following along with me through the Crafty Christmas Tree Challenge you already know that I've been stretching my $20 budget to it's limits.

And I'm not sure how this keeps happening, but my artificial tree is growing. No really- before we unpacked it I thought it was 5.5ft, then the box came down and I thought said 6ft. Then I noticed the box waiting to go back into the attic and this time the box said 6.5ft.

Since my budget and my tree and moving opposite directions I figured I better think up at least one or two free ornaments.

I've been saving PT and TP rolls for I don't know what- and thought I could come up with something good using those.


So with my tubes plus a bunch of other scraps, the hot chocolate mug ornament was born!

To make these you'll need:

PT tubes (1 tube made 5 ornaments).
Scrap white paper (both card stock and regular old printer paper)
Scrap brown paper the color of yummy hot chocolate
Cardboard- (the kind that comes in the back of notebooks and drawing pads).
Scraps of coffee filters (the ruffly ends about half and inch wide)
Red and white striped drinking straw
Mod Podge
Glue
Small amount of water in a plastic cup
String or embroidery floss to hang the ornament from
Craft Knife
Needle Tool

I started by cutting my tube into 5 segments. I eyeballed the size to what I thought would be a good mini mug height.


Next I cut some circles from my scrap cardboard.


Each mug needs two circles. One that's the same size as the PT tube, which I made by tracing around the tube. The second, smaller circle, should fit inside the tub. Make those by tracing the inside of the tube.


The large circle is glued to the the bottom of the tube.


The small circle is glued onto a piece of brown paper that's larger on all sides than the cardboard circle.

While those are drying it's a nice time to cut the white card stock. First you need a band that's long enough to wrap completely around the tube. You also need the band to be wider than the height of the mug. So if you're mug is 3 inches high cut your band 3.5 or 4 inches wide.

You'll also need a white card stock circle the same size as the circle glued on the bottom of the tube.

Once the glue on the tube is dry use Mod Podge to cover the outside with your band of white paper. Be sure to let the paper overhang on the top and bottom edges.


Next cut fringe around the paper on the top and bottom so it will wrap around the tube easily.

Wrap the paper onto the bottom and over the top. Again using Mod Podge to adhere the paper.


Once the tube is dry you can glue the circle on the bottom and cover up the wrapped paper ends.


Now back to the small circle glued to the brown paper. Cut generously around the cardboard disc and fringe the excess paper the same way you did on the tube.


Once both the disc and the tube are dry put some glue around the edge of the disc and insert it into the top of the mug. This might take a few tries- don' worry if the "hot chocolate" disc isn't exactly even in the mug... it won't make a difference in the cuteness of the finished ornament.


Then use your needle tool to make a small hole near the top of the mug. so you'll able to hang your finished ornament. I made mine near the seam of the paper because it was easy for me to remember that's where I wanted my handle to be.


To make the handle for the mug start by rolling strips of printer paper. (A toothpick helps to get it started.) Then soak them for a few minutes in water until the paper roll bends easily.


Cuve it into a "C" shape and set aside to dry (I let mine dry overnight). To keep the shape I used push pins in some styrofoam.


Once the handles are dry use a craft knife to cut the ends at and angle so they fit against the mug nicely. Glue the handles into place.


Once the handle are dry, give the entire mug a coat of Mod Podge.


Last but not least- to make them look more like hot chocolate and less like coffee I added whipped cream and a peppermint stick.

The whipped cream is a bit a coffee filter rolled into a rosette-like shape and glued onto the top.


The peppermint stick is made from a red and white straw.


First I cut it into the lengths I needed, and glue them to a scrap of white paper. Once the glue was dry I trimmed around the straws. The white circle of paper closed the tip straw and made it look solid like a peppermint stick.


The other end was cut at an angle and glued onto the surface of the hot chocolate.

Add a hanger (I used red embroidery floss that I had leftover from my other ornament projects) and you have yourself some cute (and free) upcycled ornaments!

Total taken from my budget was zero... so I still have $5.27

Stay tuned later today I'll be posting my entire tree!

Monday, December 12, 2011

Use Cookie Cutters to make Needle Felted Ornaments


I said I'd be done on with my Crafty Christmas Tree by the 15th, so it's getting down to the wire!

If you remember my felted garland turned out to be too short. After I lengthened it I ended up having some extra wool... which I definitely didn't want it to go to waste. So I used it and a cookie cutter I already had to make these cute little mitten ornaments.


I started with the mitten shaped cookie cutter, my needle felting needles, and mat.


Stuffed the cookie cutter full of wool.


Then needle felted until the shape started to hold together.


Once the wool starts to hold it's shape, pick up the cookie cutter and the wool, then flip it over and needle felt the other side.

When I was done felting I had a perfect little mitten!

Then made another so I had a pair.


Once I had a bunch of mittens, I decorated them by needle felting scraps of wool yarn onto the front.


The last step was to attach a piece of yarn between the pair and hang them over a branch on the tree.

You can use cookie cutters to needle felt lots of shapes. I've made starts and circles for banners before and they've turn out super cute!

These ornaments would also make great decorations for gift packages too! Just tie them around the bow and the recipient gets the gift plus a nice keepsake ornament.


I spent $5.00 on wool. That includes the extra I needed for the garland, the leftovers I used to make these mittens, plus a little bit of red wool I bought specifically to make the red pair. (I just had to have a classic pair of red mittens one the tree!)

So that leaves me with $5.27! And just a few more days to finish.
Related Posts Plugin for WordPress, Blogger...